绘制面 最后更新时间: 2021年01月22日
绘制圆
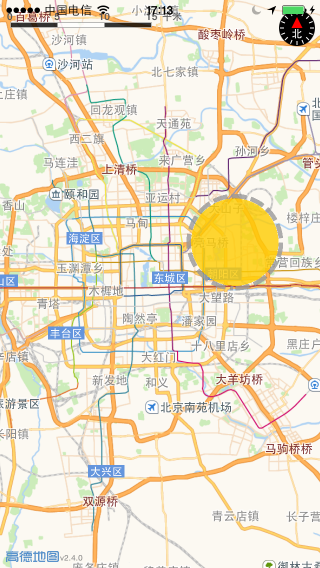
通过 MACircle 类绘制圆,圆是由中心点(经纬度)和半径(米)构成。
在地图绘制圆的步骤如下:
(1) 在ViewController.m的viewDidLoad方法中根据中心点和半径构造圆对象。
    //构造圆
    MACircle *circle = [MACircle circleWithCenterCoordinate:CLLocationCoordinate2DMake(39.952136, 116.50095) radius:5000];

    //在地图上添加圆
    [_mapView addOverlay: circle];
let circle: MACircle = MACircle(center: CLLocationCoordinate2D(latitude: 39.996441, longitude: 116.411146), radius: 10000)
mapView.add(circle)(2) 继续在ViewController.m文件中,实现<MAMapViewDelegate>协议中的mapView:rendererForOverlay:回调函数,设置圆的样式。示例代码如下:
- (MAOverlayRenderer *)mapView:(MAMapView *)mapView rendererForOverlay:(id <maoverlay>)overlay
{
    if ([overlay isKindOfClass:[MACircle class]])
    {
        MACircleRenderer *circleRenderer = [[MACircleRenderer alloc] initWithCircle:overlay];

        circleRenderer.lineWidth    = 5.f;
        circleRenderer.strokeColor  = [UIColor colorWithRed:0.6 green:0.6 blue:0.6 alpha:0.8];
        circleRenderer.fillColor    = [UIColor colorWithRed:1.0 green:0.8 blue:0.0 alpha:0.8];
        return circleRenderer;
    }
    return nil;
}
func mapView(_ mapView: MAMapView!, rendererFor overlay: MAOverlay!) -> MAOverlayRenderer! {
if overlay.isKind(of: MACircle.self) {
let renderer: MACircleRenderer = MACircleRenderer(overlay: overlay)
renderer.lineWidth = 8.0
renderer.strokeColor = UIColor.blue
renderer.fillColor = UIColor.red.withAlphaComponent(0.4)
return renderer
}
return nil
}运行程序,效果如下所示:

绘制热力图
热力图是以颜色变化展现分布情况的图层。高德地图iOS SDK自V2.6.0版本提供了热力图图层的绘制功能,您可根据业务数据(人员热度数据、人口流动热度等数据)创建可用于指导您决策的热力图。
在地图上添加热力图的步骤如下:
1.构造MAHeatMapTileOverlay 对象。
2.配置热力图图层的参数。
参数列表
名称 | 说明 |
|---|---|
data | 数据数组,数组中是 MAHeatMapNode 对象(包含:点坐标和权重值) |
radius | 半径,默认值为 12ps |
opacity | 透明度,默认值为 0.6 |
gradient | 渐变色对象 |
3.将MAHeatMapTileOverlay添加到MAMapView中。
4.实现MAMapViewDelegate的mapView:viewForOverlay:函数,在地图上显示热力图。
我们提前将数据将存放在locations.json文件中(这一步您可以采用远程服务下发的形式)。在地图上添加热力图的示例代码如下:
//构造热力图图层对象
MAHeatMapTileOverlay  *heatMapTileOverlay = [[MAHeatMapTileOverlay alloc] init];

//构造热力图数据,从locations.json中读取经纬度
NSMutableArray* data = [NSMutableArray array];

NSData *jsdata = [NSData dataWithContentsOfFile:[[NSBundle mainBundle] pathForResource:@"locations" ofType:@"json"]];

@autoreleasepool {

if (jsdata)
{
    NSArray *dicArray = [NSJSONSerialization JSONObjectWithData:jsdata options:NSJSONReadingAllowFragments error:nil];

    for (NSDictionary *dic in dicArray)
    {
        MAHeatMapNode *node = [[MAHeatMapNode alloc] init];
        CLLocationCoordinate2D coordinate;
        coordinate.latitude = [dic[@"lat"] doubleValue];
        coordinate.longitude = [dic[@"lng"] doubleValue];
        node.coordinate = coordinate;

        node.intensity = 1;//设置权重
        [data addObject:node];
    }
}
heatMapTileOverlay.data = data;

//构造渐变色对象
MAHeatMapGradient *gradient = [[MAHeatMapGradient alloc] initWithColor:@[[UIColor blueColor],[UIColor greenColor], [UIColor redColor]] andWithStartPoints:@[@(0.2),@(0.5),@(0.9)]];
heatMapTileOverlay.gradient = gradient;

//将热力图添加到地图上
[_mapView addOverlay: heatMapTileOverlay];
func initOverlay() {
        heatMap = MAHeatMapTileOverlay.init()

        let data: Data? = try! Data.init(contentsOf: URL.init(fileURLWithPath: Bundle.main.path(forResource: "heatMapData", ofType: "json")!))

        if(data != nil) {
            let jsonObj = try? JSONSerialization.jsonObject(with: data!, options: JSONSerialization.ReadingOptions.allowFragments) as! [[String:Any]]


            var arr:Array<MAHeatMapNode> = Array.init()

            for element in jsonObj! {
                let lat = element["lat"]
                let lon = element["lng"]

                let node = MAHeatMapNode.init()
                node.coordinate = CLLocationCoordinate2DMake(lat as! CLLocationDegrees, lon as! CLLocationDegrees)
                node.intensity = 1.0

                arr.append(node)
            }

            heatMap.data = arr
        }
    }
//构造渐变色对象
self.heatMap.gradient = MAHeatMapGradient.init(color: [UIColor.blue, UIColor.green, UIColor.red], andWithStartPoints: [0.2, 0.5, 0.9])

//将热力图添加到地图上
mapView.add(heatMap)
实现 MAMapViewDelegate 的 mapView:rendererForOverlay: 函数,在热力图显示在地图View上。示例代码如下:
- (MAOverlayRenderer *)mapView:(MAMapView *)mapView rendererForOverlay:(id <MAOverlay>)overlay
{
    if ([overlay isKindOfClass:[MATileOverlay class]])
    {
        MATileOverlayRenderer *tileOverlayRenderer = [[MATileOverlayRenderer alloc] initWithTileOverlay:overlay];

        return tileOverlayRenderer;
    }

    return nil;
}
func mapView(_ mapView: MAMapView!, rendererFor overlay: MAOverlay!) -> MAOverlayRenderer! {
if (overlay.isKind(of: MAHeatMapTileOverlay.self))
{
let renderer = MATileOverlayRenderer.init(tileOverlay: overlay as! MATileOverlay!)
return renderer;
}
return nil;
}运行效果如下所示:
绘制overlay(自定义图层)
图片覆盖物
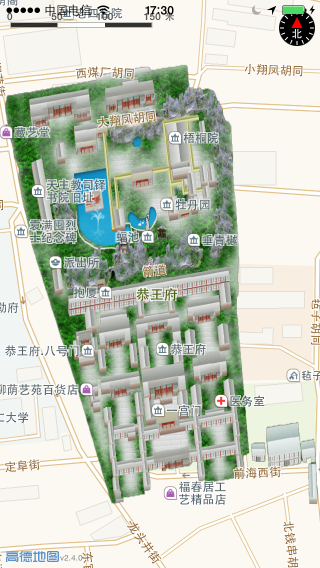
图片覆盖物类为 MAGroundOverlay,可完成将一张图片以合适的大小贴在地图指定的位置上的功能。
添加图片覆盖物的步骤如下:
(1) 在ViewController.m的viewDidLoad方法中根据范围和图片构造图片覆盖物。
- (void) viewDidLoad
{
    MACoordinateBounds coordinateBounds = MACoordinateBoundsMake(CLLocationCoordinate2DMake
(39.939577, 116.388331),CLLocationCoordinate2DMake(39.935029, 116.384377));

    MAGroundOverlay *groundOverlay = [MAGroundOverlay groundOverlayWithBounds:coordinateBounds icon:[UIImage imageNamed:@"GWF"]];

    [_mapView addOverlay:groundOverlay];
    _mapView.visibleMapRect = groundOverlay.boundingMapRect;
}
let coordBounds = MACoordinateBounds.init(northEast: CLLocationCoordinate2DMake(39.939577, 116.388331), southWest: CLLocationCoordinate2DMake(39.935029, 116.384377));
        groundOverlay = MAGroundOverlay.init(bounds: coordBounds, icon: UIImage.init(named: "GWF"))
(2) 实现<MAMapViewDelegate>协议中的mapView:rendererForOverlay:回调函数,以在地图上显示图片覆盖物。
- (MAOverlayRenderer *)mapView:(MAMapView *)mapView rendererForOverlay:(id<MAOverlay>)overlay
{
    if ([overlay isKindOfClass:[MAGroundOverlay class]])
    {
        MAGroundOverlayRenderer *groundOverlayRenderer = [[MAGroundOverlayRenderer alloc] initWithGroundOverlay:overlay];

        return groundOverlayRenderer;
    }

    return nil;
}
func mapView(_ mapView: MAMapView!, rendererFor overlay: MAOverlay!) -> MAOverlayRenderer! {
if (overlay.isKind(of: MAGroundOverlay.self))
{
let renderer = MAGroundOverlayRenderer.init(groundOverlay: overlay as! MAGroundOverlay)
return renderer;
}
return nil;
}运行效果如下所示:

绘制瓦片图层
通过瓦片图层可对基础底层地图添加额外的特性,如:某个商场的室内信息、某个景区的详情等等。自定义图层类是MATileOverlay,它定义了能添加到基础底层地图的图片集合。
添加瓦片图层的前提是使用球面墨卡托投影生成了相应的瓦片,并按照生成的格式部署在您的服务器上。在地图上显示自定义图层的步骤如下:
1.根据URL模版(即指向相关图层图片的URL)创建MATileOverlay对象。
2.设置MATileOverlay的可见最大/最小Zoom值。
3.设定MATileOverlay的可渲染区域。
4.将MATileOverlay对象添加到MAMapView中。
我们提前准备了其他地图的瓦片数据,并部署到了测试服务器上。在地图上显示的示例代码如下:
(1) 修改ViewController.m文件,在viewDidLoad方法中构造2层的对应的MATileOverlay对象,并添加到地图上。
#define kTileOverlayRemoteServerTemplate @"http://cache1.arcgisonline.cn/arcgis/rest/services/ChinaCities_Community_BaseMap_ENG/BeiJing_Community_BaseMap_ENG/MapServer/tile/{z}/{y}/{x}"
#define kTileOverlayRemoteMinZ      4
#define kTileOverlayRemoteMaxZ      17

#define kTileOverlayLocalMinZ       11
#define kTileOverlayLocalMaxZ       13

- (MATileOverlay *)constructTileOverlayWithType:(NSInteger)type
{
    MATileOverlay *tileOverlay = nil;
    if (type == 0)
    {
        tileOverlay = [[LocalTileOverlay alloc] init];
        tileOverlay.minimumZ = kTileOverlayLocalMinZ;
        tileOverlay.maximumZ = kTileOverlayLocalMaxZ;
    }
    else // type == 1
    {
        tileOverlay = [[MATileOverlay alloc] initWithURLTemplate:kTileOverlayRemoteServerTemplate];

        /* minimumZ 是tileOverlay的可见最小Zoom值. */
        tileOverlay.minimumZ = kTileOverlayRemoteMinZ;
        /* minimumZ 是tileOverlay的可见最大Zoom值. */
        tileOverlay.maximumZ = kTileOverlayRemoteMaxZ;

        /* boundingMapRect 是用来 设定tileOverlay的可渲染区域. */
        tileOverlay.boundingMapRect = MAMapRectWorld;
    }

    return tileOverlay;
}
func buildOverlay(type:UInt) -> MATileOverlay! {
        var tileOverlay:MATileOverlay!
        if (type == 0)
        {
            tileOverlay = LocalTileOverlay.init()
            tileOverlay.minimumZ = 4;
            tileOverlay.maximumZ = 17;
        }
        else // type == 1
        {
            tileOverlay = MATileOverlay.init(urlTemplate: "http://cache1.arcgisonline.cn/arcgis/rest/services/ChinaCities_Community_BaseMap_ENG/BeiJing_Community_BaseMap_ENG/MapServer/tile/{z}/{y}/{x}")

            /* minimumZ 是tileOverlay的可见最小Zoom值. */
            tileOverlay.minimumZ = 11;
            /* minimumZ 是tileOverlay的可见最大Zoom值. */
            tileOverlay.maximumZ = 13;

            /* boundingMapRect 是用来 设定tileOverlay的可渲染区域. */
            tileOverlay.boundingMapRect = MAMapRectWorld;
        }
        return tileOverlay;
    }
(2) 实现MAMapViewDelegate的mapView:viewForOverlay:函数,在瓦片显示在地图View上。示例代码如下:
- (MAOverlayRenderer *)mapView:(MAMapView *)mapView rendererForOverlay:(id <maoverlay>)overlay
{
    if ([overlay isKindOfClass:[MATileOverlay class]])
    {
        MATileOverlayRenderer *renderer = [[MATileOverlayRenderer alloc] initWithTileOverlay:overlay];
        return renderer;
    }
    return nil;
}
func mapView(_ mapView: MAMapView!, rendererFor overlay: MAOverlay!) -> MAOverlayRenderer! {

        if (overlay.isKind(of: MATileOverlay.self))
        {
            let renderer = MATileOverlayRenderer.init(tileOverlay: overlay as! MATileOverlay!)
            return renderer;
        }
        return nil;
    }
运行效果如下图所示:


