
绘制点标记 最后更新时间: 2021年01月22日
标注可以精确表示用户需要展示的位置信息,高德地图SDK提供的标注功能允许用户自定义图标和信息窗,同时提供了标注的点击、拖动事件的回调。
SDK 提供的地图标注为MAAnnotation类,不同的标记可以根据图标和改变信息窗的样式和内容加以区分。
添加默认样式点标记
iOS SDK提供的大头针标注MAPinAnnotationView,通过它可以设置大头针颜色、是否显示动画、是否支持长按后拖拽大头针改变坐标等。在地图上添加大头针标注的步骤如下:
(1) 修改ViewController.m文件,在viewDidAppear方法中添加如下所示代码添加标注数据对象。
MAPointAnnotation *pointAnnotation = [[MAPointAnnotation alloc] init];
    pointAnnotation.coordinate = CLLocationCoordinate2DMake(39.989631, 116.481018);
    pointAnnotation.title = @"方恒国际";
    pointAnnotation.subtitle = @"阜通东大街6号";

    [_mapView addAnnotation:pointAnnotation];
let pointAnnotation = MAPointAnnotation()
pointAnnotation.coordinate = CLLocationCoordinate2D(latitude: 39.979590, longitude: 116.352792)
pointAnnotation.title = "方恒国际"
pointAnnotation.subtitle = "阜通东大街6号"
mapView.addAnnotation(pointAnnotation)(2) 实现 <MAMapViewDelegate> 协议中的 mapView:viewForAnnotation:回调函数,设置标注样式。 如下所示:
- (MAAnnotationView *)mapView:(MAMapView *)mapView viewForAnnotation:(id <MAAnnotation>)annotation
{
    if ([annotation isKindOfClass:[MAPointAnnotation class]])
    {
        static NSString *pointReuseIndentifier = @"pointReuseIndentifier";
        MAPinAnnotationView*annotationView = (MAPinAnnotationView*)[mapView dequeueReusableAnnotationViewWithIdentifier:pointReuseIndentifier];
        if (annotationView == nil)
        {
            annotationView = [[MAPinAnnotationView alloc] initWithAnnotation:annotation reuseIdentifier:pointReuseIndentifier];
        }
        annotationView.canShowCallout= YES;       //设置气泡可以弹出,默认为NO
        annotationView.animatesDrop = YES;        //设置标注动画显示,默认为NO
        annotationView.draggable = YES;        //设置标注可以拖动,默认为NO
        annotationView.pinColor = MAPinAnnotationColorPurple;
        return annotationView;
    }
    return nil;
}
func mapView(_ mapView: MAMapView!, viewFor annotation: MAAnnotation!) -> MAAnnotationView! {

        if annotation.isKind(of: MAPointAnnotation.self) {
            let pointReuseIndetifier = "pointReuseIndetifier"
            var annotationView: MAPinAnnotationView? = mapView.dequeueReusableAnnotationView(withIdentifier: pointReuseIndetifier) as! MAPinAnnotationView?

            if annotationView == nil {
                annotationView = MAPinAnnotationView(annotation: annotation, reuseIdentifier: pointReuseIndetifier)
            }

            annotationView!.canShowCallout = true
            annotationView!.animatesDrop = true
            annotationView!.isDraggable = true
            annotationView!.rightCalloutAccessoryView = UIButton(type: UIButtonType.detailDisclosure)

            let idx = annotations.index(of: annotation as! MAPointAnnotation)
            annotationView!.pinColor = MAPinAnnotationColor(rawValue: idx!%3)!

            return annotationView!
        }

        return nil
    }
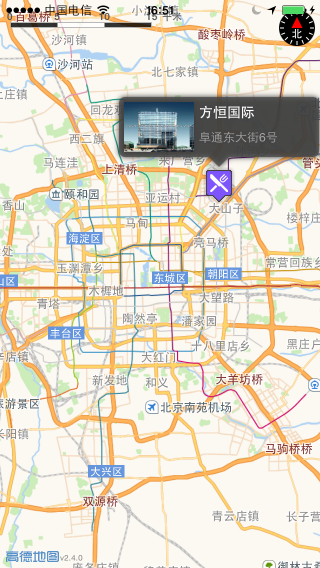
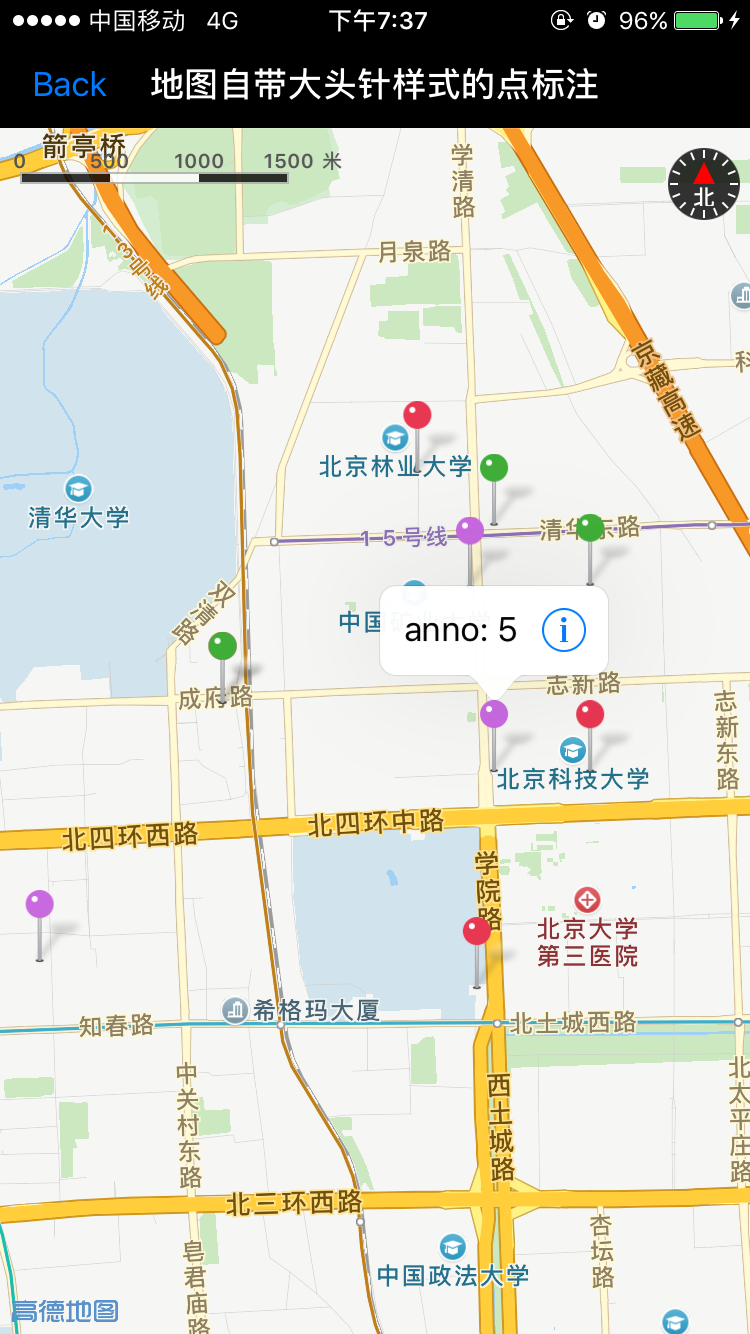
运行程序,在地图显示对应的标注点,点击标注弹出气泡,效果如图:
添加自定义样式点标记
iOS SDK可自定义标注(包括 自定义标注图标 和 自定义气泡图标),均通过MAAnnotationView来实现。
自定义标注图标
若大头针样式的标注不能满足您的需求,您可以自定义标注图标。步骤如下:
(1) 添加标注数据对象,可参考大头针标注的步骤(1)。
(2) 导入标记图片文件到工程中。这里我们导入一个名为 restauant.png 的图片文件。
(3) 在 <MAMapViewDelegate>协议的回调函数mapView:viewForAnnotation:中修改 MAAnnotationView 对应的标注图片。示例代码如下:
- (MAAnnotationView *)mapView:(MAMapView *)mapView viewForAnnotation:(id<MAAnnotation>)annotation
{
    if ([annotation isKindOfClass:[MAPointAnnotation class]])
    {
        static NSString *reuseIndetifier = @"annotationReuseIndetifier";
        MAAnnotationView *annotationView = (MAAnnotationView *)[mapView dequeueReusableAnnotationViewWithIdentifier:reuseIndetifier];
        if (annotationView == nil)
        {
            annotationView = [[MAAnnotationView alloc] initWithAnnotation:annotation
reuseIdentifier:reuseIndetifier];
        }
        annotationView.image = [UIImage imageNamed:@"restaurant"];
        //设置中心点偏移,使得标注底部中间点成为经纬度对应点
        annotationView.centerOffset = CGPointMake(0, -18);
        return annotationView;
    }
    return nil;
}
func mapView(_ mapView: MAMapView!, viewFor annotation: MAAnnotation!) -> MAAnnotationView! {
if annotation.isKind(of: MAPointAnnotation.self) {
let pointReuseIndetifier = "pointReuseIndetifier"
var annotationView: MAAnnotationView? = mapView.dequeueReusableAnnotationView(withIdentifier: pointReuseIndetifier)
if annotationView == nil {
annotationView = MAAnnotationView(annotation: annotation, reuseIdentifier: pointReuseIndetifier)
}
annotationView!.image = UIImage(named: "restaurant")
//设置中心点偏移,使得标注底部中间点成为经纬度对应点
annotationView!.centerOffset = CGPoint(0, -18);
return annotationView!
}
return nil
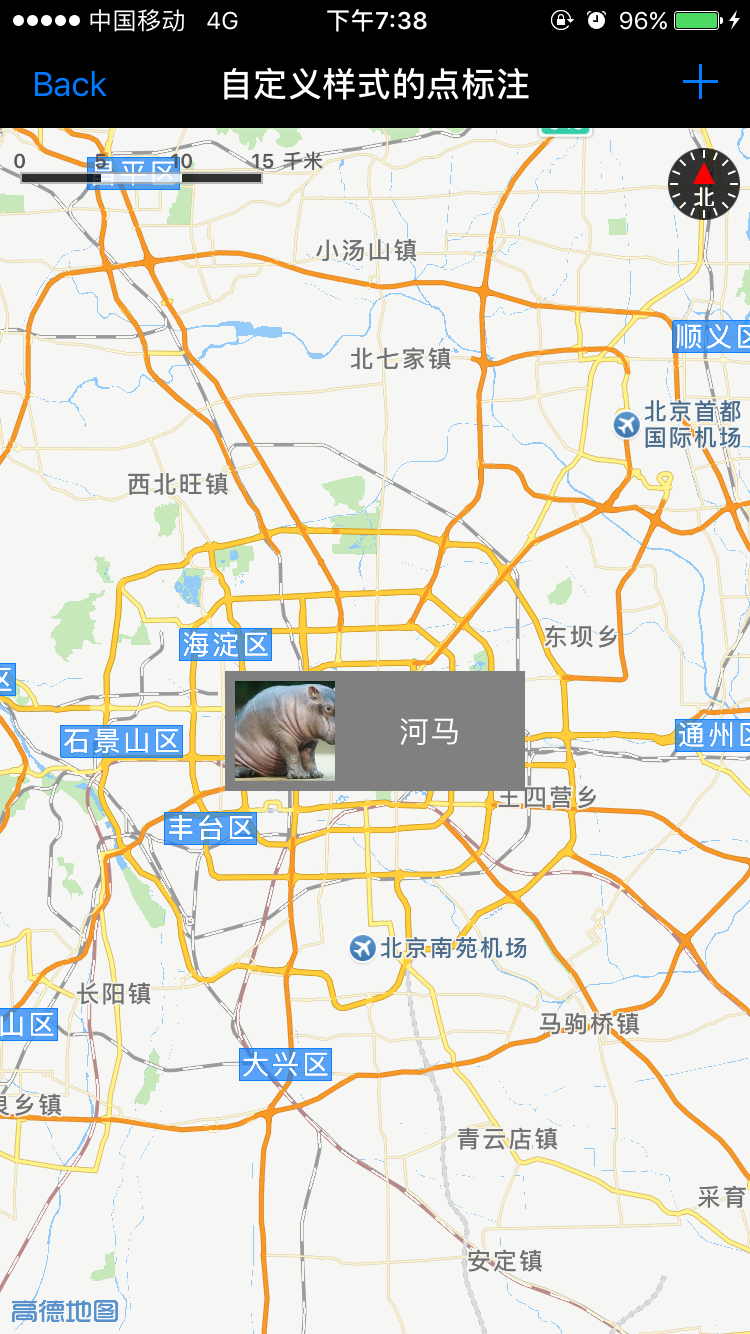
}运行程序,标注点变成了餐馆图标,如下所示:
添加自定义气泡
气泡在iOS中又称为callout,它由背景和气泡内容构成,如下图所示:
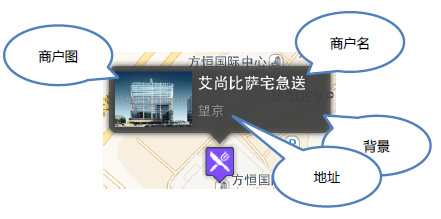
每个气泡显示的内容是根据您的需求定义的,这里我们按照如上图所示的气泡介绍实现一个自定义气泡的步骤,由于是高度自定义内容,以下文档中仅提供OC语言的示例:
(1) 新建自定义气泡类 CustomCalloutView,继承 UIView。
(2) 在 CustomCalloutView.h 中定义数据属性,包含:图片、商户名和商户地址。
@interface CustomCalloutView : UIView

@property (nonatomic, strong) UIImage *image; //商户图
@property (nonatomic, copy) NSString *title; //商户名
@property (nonatomic, copy) NSString *subtitle; //地址

@end
(3) 在CustomCalloutView.m中重写UIView的drawRect方法,绘制弹出气泡的背景。
#define kArrorHeight        10

- (void)drawRect:(CGRect)rect
{

    [self drawInContext:UIGraphicsGetCurrentContext()];

    self.layer.shadowColor = [[UIColor blackColor] CGColor];
    self.layer.shadowOpacity = 1.0;
    self.layer.shadowOffset = CGSizeMake(0.0f, 0.0f);

}

- (void)drawInContext:(CGContextRef)context
{

    CGContextSetLineWidth(context, 2.0);
    CGContextSetFillColorWithColor(context, [UIColor colorWithRed:0.3 green:0.3 blue:0.3 alpha:0.8].CGColor);

    [self getDrawPath:context];
    CGContextFillPath(context);

}

- (void)getDrawPath:(CGContextRef)context
{
    CGRect rrect = self.bounds;
    CGFloat radius = 6.0;
    CGFloat minx = CGRectGetMinX(rrect),
    midx = CGRectGetMidX(rrect),
    maxx = CGRectGetMaxX(rrect);
    CGFloat miny = CGRectGetMinY(rrect),
    maxy = CGRectGetMaxY(rrect)-kArrorHeight;

    CGContextMoveToPoint(context, midx+kArrorHeight, maxy);
    CGContextAddLineToPoint(context,midx, maxy+kArrorHeight);
    CGContextAddLineToPoint(context,midx-kArrorHeight, maxy);

    CGContextAddArcToPoint(context, minx, maxy, minx, miny, radius);
    CGContextAddArcToPoint(context, minx, minx, maxx, miny, radius);
    CGContextAddArcToPoint(context, maxx, miny, maxx, maxx, radius);
    CGContextAddArcToPoint(context, maxx, maxy, midx, maxy, radius);
    CGContextClosePath(context);
}
override func draw(_ rect: CGRect) {
        drawInContext(context: UIGraphicsGetCurrentContext()!)
        self.layer.shadowColor = UIColor.black.cgColor
        self.layer.shadowOpacity = 1.0
        self.layer.shadowOffset = CGSize.init(width: 0.0, height: 0.0)
    }

    func drawInContext(context : CGContext) {
        context.setLineWidth(2.0)
        context.setFillColor(red: 0.3, green: 0.3, blue: 0.3, alpha: 0.8)
        getDrawPath(context: context)
        context.fillPath()
    }

    func getDrawPath(context : CGContext) {
        let kArrorHeight = 10
        let rect = self.bounds
        let radius = 6.0
        let minx = rect.minX
        let midx = rect.midX
        let maxx = rect.maxX
        let miny = rect.minY
        let maxy = rect.maxY - 10

        context.move(to: CGPoint.init(x: midx + CGFloat(kArrorHeight), y: maxy))
        context.addLine(to: CGPoint.init(x: midx, y: maxy + CGFloat(kArrorHeight)))
        context.addLine(to: CGPoint.init(x: midx - CGFloat(kArrorHeight), y: maxy))

        context.addArc(tangent1End: CGPoint.init(x: minx, y: maxy), tangent2End: CGPoint.init(x: minx, y: miny), radius: CGFloat(radius))
        context.addArc(tangent1End: CGPoint.init(x: minx, y: minx), tangent2End: CGPoint.init(x: maxx, y: miny), radius: CGFloat(radius))
        context.addArc(tangent1End: CGPoint.init(x: maxx, y: miny), tangent2End: CGPoint.init(x: maxx, y: maxx), radius: CGFloat(radius))
        context.addArc(tangent1End: CGPoint.init(x: maxx, y: maxy), tangent2End: CGPoint.init(x: midx, y: maxy), radius: CGFloat(radius))
        context.closePath();
    }
(4) 定义用于显示气泡内容的控件,并添加到SubView中。
如上图所示气泡,我们需要一个UIImageView和两个UILabel,添加方法如下:
#define kPortraitMargin     5
#define kPortraitWidth      70
#define kPortraitHeight     50

#define kTitleWidth         120
#define kTitleHeight        20

@interface CustomCalloutView ()

@property (nonatomic, strong) UIImageView *portraitView;
@property (nonatomic, strong) UILabel *subtitleLabel;
@property (nonatomic, strong) UILabel *titleLabel;

@end

@implementation CustomCalloutView

- (id)initWithFrame:(CGRect)frame
{
    self = [super initWithFrame:frame];
    if (self)
    {
        self.backgroundColor = [UIColor clearColor];
        [self initSubViews];
    }
    return self;
}

- (void)initSubViews
{
    // 添加图片,即商户图
    self.portraitView = [[UIImageView alloc] initWithFrame:CGRectMake(kPortraitMargin, kPortraitMargin, kPortraitWidth, kPortraitHeight)];

    self.portraitView.backgroundColor = [UIColor blackColor];
    [self addSubview:self.portraitView];

    // 添加标题,即商户名
    self.titleLabel = [[UILabel alloc] initWithFrame:CGRectMake(kPortraitMargin * 2 + kPortraitWidth, kPortraitMargin, kTitleWidth, kTitleHeight)];
    self.titleLabel.font = [UIFont boldSystemFontOfSize:14];
    self.titleLabel.textColor = [UIColor whiteColor];
    self.titleLabel.text = @"titletitletitletitle";
    [self addSubview:self.titleLabel];

    // 添加副标题,即商户地址
    self.subtitleLabel = [[UILabel alloc] initWithFrame:CGRectMake(kPortraitMargin * 2 + kPortraitWidth, kPortraitMargin * 2 + kTitleHeight, kTitleWidth, kTitleHeight)];
    self.subtitleLabel.font = [UIFont systemFontOfSize:12];
    self.subtitleLabel.textColor = [UIColor lightGrayColor];
    self.subtitleLabel.text = @"subtitleLabelsubtitleLabelsubtitleLabel";
    [self addSubview:self.subtitleLabel];
}
var portraitView : UIImageView!
    var subtitleLabel : UILabel!
    var titleLabel : UILabel!

    override init(frame: CGRect) {
        super.init(frame: frame)
        initSubViews()
    }

    required init?(coder aDecoder: NSCoder) {
        super.init(coder: aDecoder)
        initSubViews()
    }

    func initSubViews() {
        backgroundColor = UIColor.clear
        let kPortraitMargin = 5.0
        let kPortraitWidth = 70.0
        let kPortraitHeight = 50.0
        let kTitleWidth = 120.0
        let kTitleHeight = 20.0

        // 添加图片,即商户图
        portraitView = UIImageView.init(frame: CGRect.init(x: kPortraitMargin, y: kPortraitMargin, width: kPortraitWidth, height: kPortraitHeight))
        portraitView.backgroundColor = UIColor.black
        addSubview(portraitView)

        // 添加标题,即商户名
        titleLabel = UILabel.init(frame: CGRect.init(x: kPortraitMargin * 2 + kPortraitWidth, y: kPortraitMargin, width: kTitleWidth, height: kTitleHeight))
        titleLabel.font = UIFont.systemFont(ofSize: 14)
        titleLabel.textColor = UIColor.white
        titleLabel.text = "titletitletitletitle"
        addSubview(titleLabel)

        // 添加副标题,即商户地址
        subtitleLabel = UILabel.init(frame: CGRect.init(x: kPortraitMargin * 2 + kPortraitWidth, y: kPortraitMargin * 2 + kTitleHeight, width: kTitleWidth, height: kTitleHeight))
        subtitleLabel.font = UIFont.systemFont(ofSize: 12)
        subtitleLabel.textColor = UIColor.lightGray
        subtitleLabel.text = "titletitletitletitle"
        addSubview(subtitleLabel)
    }
(5) 在CustomCalloutView.m中给控件传入数据。
- (void)setTitle:(NSString *)title
{
    self.titleLabel.text = title;
}

- (void)setSubtitle:(NSString *)subtitle
{
    self.subtitleLabel.text = subtitle;
}

- (void)setImage:(UIImage *)image
{
    self.portraitView.image = image;
}
func setTitle(title : NSString) {
        titleLabel.text = title as String;
    }

    func setSubtitle(subtitle : NSString) {
        subtitleLabel.text = subtitle as String;
    }

    func setImage(image : UIImage) {
        portraitView.image = image;
    }
以上就是自定义气泡的全部过程,但是为了在点击标注时,弹出自定义的气泡,还需要。步骤如下:
添加自定义AnnotationView
由于是高度自定义内容,以下文档中仅提供OC语言的示例:
(1) 新建类CustomAnnotationView,继承MAAnnotationView或MAPinAnnotationView。若继承MAAnnotationView,则需要设置标注图标;若继承MAPinAnnotationView,使用默认的大头针标注
(2) 在CustomAnnotationView.h中定义自定义气泡属性
代码如下所示:
#import "CustomCalloutView.h"

@interface CustomAnnotationView : MAAnnotationView

@property (nonatomic, readonly) CustomCalloutView *calloutView;

@end
 func setSelected(selected: Bool, animated: Bool) {
        if self.isSelected == selected{
            return;
        }
        if selected {
            if calloutView == nil {
                calloutView = CustomCalloutView.init(frame: CGRect.init(x: 0, y: 0, width: 200, height: 70))
                calloutView.center = CGPoint.init(x: bounds.width/2 + calloutOffset.x, y: -calloutView.bounds.height/2 + calloutOffset.y)
            }
            calloutView.image = UIImage.init(named: "building")
            calloutView.title = annotation.title as? NSString
            calloutView.subtitle = annotation.subtitle as? NSString
            addSubview(calloutView)
        } else {
            calloutView.removeFromSuperview()
        }
        super.setSelected(selected, animated: animated)
    }
(3) 在CustomAnnotationView.m中修改calloutView属性
如下:
@interface CustomAnnotationView ()

@property (nonatomic, strong, readwrite) CustomCalloutView *calloutView;

@end
(4) 重写选中方法setSelected。选中时新建并添加calloutView,传入数据;非选中时删除calloutView。
#define kCalloutWidth       200.0
#define kCalloutHeight      70.0

- (void)setSelected:(BOOL)selected animated:(BOOL)animated
{
    if (self.selected == selected)
    {
        return;
    }

    if (selected)
    {
        if (self.calloutView == nil)
        {
            self.calloutView = [[CustomCalloutView alloc] initWithFrame:CGRectMake(0, 0, kCalloutWidth, kCalloutHeight)];
            self.calloutView.center = CGPointMake(CGRectGetWidth(self.bounds) / 2.f + self.calloutOffset.x,
                                                  -CGRectGetHeight(self.calloutView.bounds) / 2.f + self.calloutOffset.y);
        }

        self.calloutView.image = [UIImage imageNamed:@"building"];
        self.calloutView.title = self.annotation.title;
        self.calloutView.subtitle = self.annotation.subtitle;

        [self addSubview:self.calloutView];
    }
    else
    {
        [self.calloutView removeFromSuperview];
    }

    [super setSelected:selected animated:animated];
}
注意:提前导入building.png图片。
(5) 修改ViewController.m,在MAMapViewDelegate的回调方法mapView:viewForAnnotation中的修改annotationView的类型
代码如下:
#import “CustomAnnotationView.h”

- (MAAnnotationView *)mapView:(MAMapView *)mapView viewForAnnotation:(id<MAAnnotation>)annotation
{
    if ([annotation isKindOfClass:[MAPointAnnotation class]])
    {
        static NSString *reuseIndetifier = @"annotationReuseIndetifier";
        CustomAnnotationView *annotationView = (CustomAnnotationView *)[mapView dequeueReusableAnnotationViewWithIdentifier:reuseIndetifier];
        if (annotationView == nil)
        {
            annotationView = [[CustomAnnotationView alloc] initWithAnnotation:annotation reuseIdentifier:reuseIndetifier];
        }
        annotationView.image = [UIImage imageNamed:@"restaurant"];

        // 设置为NO,用以调用自定义的calloutView
        annotationView.canShowCallout = NO;

        // 设置中心点偏移,使得标注底部中间点成为经纬度对应点
        annotationView.centerOffset = CGPointMake(0, -18);
        return annotationView;
    }
    return nil;
}
	func mapView(_ mapView: MAMapView!, viewFor annotation: MAAnnotation!) -> MAAnnotationView! {
        if annotation is MAPointAnnotation {
            let customReuseIndetifier: String = "annotationReuseIndetifier"

            var annotationView = mapView.dequeueReusableAnnotationView(withIdentifier: customReuseIndetifier) as? CustomAnnotationView

            if annotationView == nil {
                annotationView = CustomAnnotationView.init(annotation: annotation, reuseIdentifier: customReuseIndetifier)

            }
            annotationView?.image = UIImage.init(named: "restaurant")

            // 设置为false,用以调用自定义的calloutView
            annotationView?.canShowCallout = false
            // 设置中心点偏移,使得标注底部中间点成为经纬度对应点
            annotationView?.centerOffset = CGPoint.init(x: 0, y: -18)
            return annotationView
        }

        return nil
    }
运行程序,效果如下: