

地图组件-iOS 最后更新时间: 2021年01月22日
此文档仅包含地图部分核心功能, 如需查看更详细地图相关文档请查看<高德地图iOS接入文档>
基本功能
显示地图
第一步:准备工作
1) 如果您还没有配置 3D 地图 SDK 到工程中,可以先参考手动部署或自动部署配置工程.
2) 如果您需要 SDK 使用 HTTPS 协议发起网络请求可以参考应用HTTPS解决方案章节的内容.
第二步:配置头文件
在您的 ViewController.h 中添加以下两个头文件,注意Swift需要在桥接文件中引入头文件:
#import <MAMapKit/MAMapKit.h>
#import <AMapFoundationKit/AMapFoundationKit.h>
//在桥接文件中引入头文件
#import <MAMapKit/MAMapKit.h>
#import <AMapFoundationKit/AMapFoundationKit.h>第三步:实例化地图对象
在 MapTypeViewController.m 文件中添加实例化 MAMapView 的代码.
- (void)viewDidLoad
{

    [super viewDidLoad];
    // Do any additional setup after loading the view, typically from a nib.

    ///地图需要v4.5.0及以上版本才必须要打开此选项(v4.5.0以下版本,需要手动配置info.plist)
    [AMapServices sharedServices].enableHTTPS = YES;

    ///初始化地图
    MAMapView *_mapView = [[MAMapView alloc] initWithFrame:self.view.bounds];

    ///把地图添加至view
    [self.view addSubview:_mapView];

}
override func viewDidLoad() {
        super.viewDidLoad(animated)
    let mapView = MAMapView(frame: self.view.bounds)
    mapView.delegate = self
    self.view.addSubview(mapView)
    }
高级功能
更多高级功能,请查看地图SDK:http://lbs.amap.com/api/ios-sdk/summary
功能1: 显示乘客定位位置
第一步: 配置头文件
在您的 ViewController.h 中添加以下两个头文件:
#import <MAMapKit/MAMapKit.h>
#import <AMapFoundationKit/AMapFoundationKit.h>
#import <MAMapKit/MAMapKit.h>
#import <AMapFoundationKit/AMapFoundationKit.h>第二步:显示定位蓝点
创建地图对象
在 MapTypeViewController.m 文件中添加实例化 MAMapView 对象,示例如下:
- (void)viewDidLoad
{
    [super viewDidLoad];
    // Do any additional setup after loading the view, typically from a nib.

    ///地图需要v4.5.0及以上版本才必须要打开此选项(v4.5.0以下版本,需要手动配置info.plist)
    [AMapServices sharedServices].enableHTTPS = YES;

    ///初始化地图
    MAMapView *_mapView = [[MAMapView alloc] initWithFrame:self.view.bounds];

    ///把地图添加至view
    [self.view addSubview:_mapView];

    ///如果您需要进入地图就显示定位小蓝点,则需要下面两行代码
    _mapView.showsUserLocation = YES;
    _mapView.userTrackingMode = MAUserTrackingModeFollow;

}
override func viewDidLoad() {
super.viewDidAppear(animated)
AMapServices.shared().enableHTTPS = true
mapView = MAMapView(frame: self.view.bounds)
mapView.delegate = self
mapView.showsUserLocation = true
mapView.userTrackingMode = .follow
self.view.addSubview(mapView)
}注意:5.1.0后由于定位蓝点增加了平滑移动功能,如果在开启定位的情况下先添加annotation,需要在此回调方法中判断annotation是否为MAUserLocation,从而返回正确的View.注释如下:
/**
 * @brief 根据anntation生成对应的View。

 注意:5.1.0后由于定位蓝点增加了平滑移动功能,如果在开启定位的情况先添加annotation,需要在此回调方法中判断annotation是否为MAUserLocation,从而返回正确的View。
 if ([annotation isKindOfClass:[MAUserLocation class]]) {
    return nil;
 }

 * @param mapView 地图View
 * @param annotation 指定的标注
 * @return 生成的标注View
 */
- (MAAnnotationView *)mapView:(MAMapView *)mapView viewForAnnotation:(id <MAAnnotation>)annotation;
配置定位权限
在 Info.plist 文件中增加定位权限配置,如下图示:

值得注意的是,定位权限有三种,您可根据需求进行选择.
Privacy - Location Always Usage Description | 始终允许访问位置信息 |
|---|---|
Privacy - Location Usage Description | 永不允许访问位置信息 |
Privacy - Location When In Use Usage Description | 使用应用期间允许访问位置信息 |
自定义小蓝点
以下功能自iOS 地图 SDK V5.0.0 版本起支持.
初始化 MAUserLocationRepresentation 对象:
MAUserLocationRepresentation *r = [[MAUserLocationRepresentation alloc] init];let r = MAUserLocationRepresentation()精度圈是否显示:
r.showsAccuracyRing = NO;///精度圈是否显示,默认YES
r.showsAccuracyRing = false是否显示蓝点方向指向:
r.showsHeadingIndicator = NO;///是否显示方向指示(MAUserTrackingModeFollowWithHeading模式开启)。默认为YES
r.showsHeadingIndicator = false
调整精度圈填充颜色:
r.fillColor = [UIColor redColor];///精度圈 填充颜色, 默认 kAccuracyCircleDefaultColorr.fillColor = UIColor.red
调整精度圈边线颜色:
r.strokeColor = [UIColor blueColor];///精度圈 边线颜色, 默认 kAccuracyCircleDefaultColor
r.strokeColor = UIColor.blue
调整精度圈边线宽度:
r.lineWidth = 2;///精度圈 边线宽度,默认0
r.lineWidth = 2
精度圈是否显示律动效果:
r.enablePulseAnnimation = NO;///内部蓝色圆点是否使用律动效果, 默认YES
r.enablePulseAnnimation = false调整定位蓝点的背景颜色:
r.locationDotBgColor = [UIColor greenColor];///定位点背景色,不设置默认白色
r.locationDotBgColor = UIColor.green
调整定位蓝点的颜色:
r.locationDotFillColor = [UIColor grayColor];///定位点蓝色圆点颜色,不设置默认蓝色r.locationDotFillColor = UIColor.gray
调整定位蓝点的图标:
r.image = [UIImage imageNamed:@"你的图片"]; ///定位图标, 与蓝色原点互斥
r.image = UIImage(named: "您的图片")
执行:
[self.mapView updateUserLocationRepresentation:r];mapView.update(r)
功能2:自定义地图
第一步:创建地图样式
高德地图开放平台的开发者在取得开发者账号后,可以进入开发者控制台,在地图自定义平台选择“创建地图样式”,可以选择一个模板进行创建.
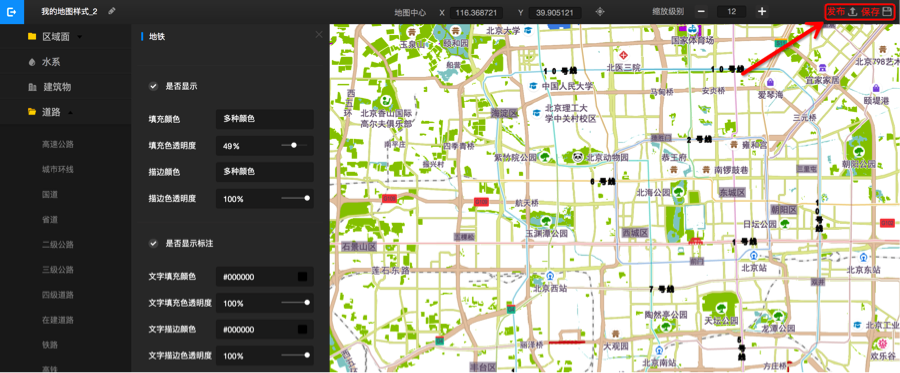
第二步:编辑地图样式
在创建的页面的左侧列表选择任一要素编辑样式属性;也可以单击地图,在弹出的列表中选择要素进行编辑.
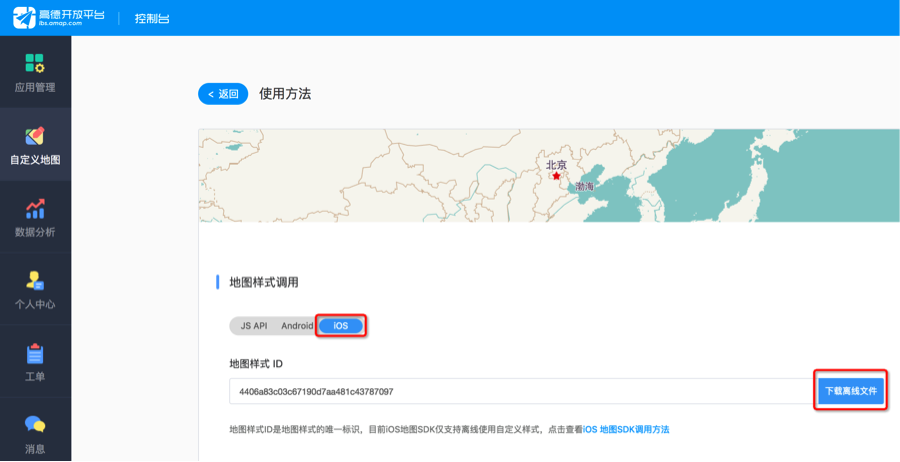
第三步:发布地图样式&下载
编辑完成后点击右上角“保存”->“发布”,发布完成后,选择“使用方法”,然后选择“ios”平台,点击“下载离线文件”.
第四步:设置离线自定义样式
设置方法( V5.2.0及以上版本使用以下方法,其他版本仍使用老的调用方法):
/**
 * @brief 根据web导出数据设置地图样式, 目前仅支持自定义标准类型. 默认不生效,调用customMapStyleEnabled=YES使生效. since 5.2.0
 * @param data 高德web端工具导出的地图样式数据.
 */
- (void)setCustomMapStyleWithWebData:(NSData*)data;
示例代码:
NSString *path = [NSString stringWithFormat:@"%@/webExportedStyleData.data", [NSBundle mainBundle].bundlePath];
    NSData *data = [NSData dataWithContentsOfFile:path];
    [self.mapView setCustomMapStyleWithWebData:data];
    [self.mapView setCustomMapStyleEnabled:YES];
var path = Bundle.main.bundlePath
path.append("/webExportedStyleData.data")
let jsonData = NSData.init(contentsOfFile: path)
self.mapView.setCustomMapStyleWithWebData(jsonData as Data!)
self.mapView.customMapStyleEnabled = true;设置在线自定义样式(v6.0.0以上版本)
/**
 * @brief 自定义地图样式id, 官网发布后下次开启自定义样式便可生效,目前仅支持自定义标准类型. 默认不生效,调用customMapStyleEnabled=YES使生效. since 6.0.0
 * @param customMapStyleID 自定义样式ID,从官网获取
 */
- (void)setCustomMapStyleID:(NSString *)customMapStyleID;[self.mapView setCustomMapStyleID:@"yourID"];
self.mapView.customMapStyleEnabled = YES;self.mapView.setCustomMapStyleID("yourID");
self.mapView.customMapStyleEnabled = true;第五步:自定义纹理(需联系商务购买)
第一步:自定义平台配置纹理
在自定义平台选择支持纹理配置的属性(如陆地),选择配置纹理,可以选择平台提供的图片,也可以自行上传(注:图片大小为2^n*2^n效果会更好)(目前移动端支持的纹理为陆地、绿地、水系和建筑物)
第二步:下载样式文件
在第一步配置完成之后选择发布样式,回来到样式下载页面,参考之前提到的方式下载离线样式文件,下载名称为 mystyle_sdk_xx.zip 解压后结构如下
style.datatextures.zip第三步:设置样式文件
将上一步中两个文件加到您的工程,并打包到您的app
NSData *data = [NSData dataWithContentsOfFile:@"style.data path"];
[self.mapView setCustomMapStyleWithWebData:data];
[self.mapView setCustomTextureResourcePath:@"texture.zip path"];
[self.mapView setCustomMapStyleEnabled:YES];
let jsonData = NSData.init(contentsOfFile: "style.data path")
self.mapView.setCustomMapStyleWithWebData(jsonData as Data!)
self.mapView.setCustomTextureResourcePath("texture.zip path");
self.mapView.customMapStyleEnabled = true;注:纹理暂不支持在线拉取,如果调用了setCustomMapStyleID也需要将纹理通过setCustomTextureResourcePath设置了才会生效.
功能3: 驾车出行路线规划
注意:下面介绍的功能使用的是地图SDK的搜索功能,需要在工程中导入搜索功能库(AMapSearchKit.framework).
驾车出行路线规划常用于驾车里程的价格预估,以及出行路线的提前规划.
实现驾车路线规划的步骤如下:
第一步:引入头文件
引入 AMapFoundationKit.h 和 AMapSearchKit.h 这两个头文件.
#import <AMapFoundationKit/AMapFoundationKit.h>

#import <AMapSearchKit/AMapSearchKit.h>
//在桥接文件中引入头文件
#import <AMapFoundationKit/AMapFoundationKit.h>
#import <AMapSearchKit/AMapSearchKit.h>第二步:配置Key
在使用搜索功能时,需要添加 Key.
如果您使用的是搜索库(AMapSearchKit.framework) v4.x 版本需要引入基础 SDK AMapFoundationKit.framework ,设置 Key 的方法如下:
iOS 搜索功能 v4.x 版本设置 Key:
[AMapServices sharedServices].apiKey = @"您的key";AMapServices.shared().apiKey = "您的Key"
如果您使用的是搜索功能 v3.x 或之前版本,请您尽快更新.
iOS 搜索功能 v3.x 版本设置 Key:
[AMapSearchServices sharedServices].apiKey = @"您的key";AMapSearchServices.shared().apiKey = "您的Key"第三步:定义AmapserachAPI
定义主搜索对象 AMapSearchAPI ,并继承搜索协议<AMapSearchDelegate>.
第四步:构造 AMapSearchAPI
构造主搜索对象 AMapSearchAPI,并设置代理.
self.search = [[AMapSearchAPI alloc] init];
self.search.delegate = self;
search = AMapSearchAPI()
search.delegate = self第五步:设置驾车线路规划参数
请求参数类为 AMapDrivingRouteSearchRequest,其中:
- origin:起点坐标,必设.
- destination:终点坐标,必设.
- waypoints:途经点,最多支持16个途经点.
- avoidpolygons:避让区域,最多支持100个避让区域,每个区域16个点.
- avoidroad:避让道路,设置避让道路后,避让区域失效.
- strategy:路径规划的策略,可选,推荐使用策略10;详细策略请见驾车策略说明.
self.startAnnotation.coordinate = self.startCoordinate;
self.destinationAnnotation.coordinate = self.destinationCoordinate;

AMapDrivingRouteSearchRequest *navi = [[AMapDrivingRouteSearchRequest alloc] init];

navi.requireExtension = YES;
navi.strategy = 5;
/* 出发点. */
navi.origin = [AMapGeoPoint locationWithLatitude:self.startCoordinate.latitude
                                       longitude:self.startCoordinate.longitude];
/* 目的地. */
navi.destination = [AMapGeoPoint locationWithLatitude:self.destinationCoordinate.latitude
                                            longitude:self.destinationCoordinate.longitude];
startCoordinate = CLLocationCoordinate2DMake(39.910267, 116.370888)
destinationCoordinate = CLLocationCoordinate2DMake(39.989872, 116.481956)
let request = AMapDrivingRouteSearchRequest()
request.origin = AMapGeoPoint.location(withLatitude: CGFloat(startCoordinate.latitude), longitude: CGFloat(startCoordinate.longitude))
request.destination = AMapGeoPoint.location(withLatitude: CGFloat(destinationCoordinate.latitude), longitude: CGFloat(destinationCoordinate.longitude))
request.requireExtension = true第六步:发起驾车路线规划
[self.search AMapDrivingRouteSearch:navi];search.aMapDrivingRouteSearch(request)第七步:在回调中处理数据
当检索成功时,会进到 onRouteSearchDone 回调函数中,在该回调中,通过解析 AMapRouteSearchResponse 获取将驾车规划路线的数据显示在地图上.
说明:
1)可以在回调中解析 response,获取驾车的路径.
2)response.route.paths 可以获取到 AMapPath 列表,驾车方案的详细信息可参考 AMapPath 类.
3)规划路径的结果构成如下图所示,可根据此结构图解析结果,准确展示线路.
/* 路径规划搜索回调. */
- (void)onRouteSearchDone:(AMapRouteSearchBaseRequest *)request response:(AMapRouteSearchResponse *)response
{
    if (response.route == nil)
    {
        return;
    }

   //解析response获取路径信息,具体解析见 Demo
}
func onRouteSearchDone(_ request: AMapRouteSearchBaseRequest!, response: AMapRouteSearchResponse!) {
    if response.count > 0 {
        //解析response获取路径信息
    }
}
说明:
当检索失败时,会进入 didFailWithError 回调函数,通过该回调函数获取产生的失败的原因.
- (void)AMapSearchRequest:(id)request didFailWithError:(NSError *)error
{
    NSLog(@"Error: %@", error);
}
func aMapSearchRequest(_ request: Any!, didFailWithError error: Error!) {
print("Error:\(error)")
}参考手册
iOS高德地图SDK(3D): 参考手册
iOS高德地图SDK(2D): 参考手册
搜索: 参考手册
FoundationSDK: 参考手册